Are you struggling to keep track of your warehouse inventory? Let me introduce you to Memento Database – a flexible solution available for both mobile devices and desktop computers. Don’t worry if you’ve never worked with databases before; I’ll guide you through the process in simple terms.
Understanding Libraries – Your Digital Storage Containers
Think of Memento Database libraries as digital spreadsheets or tables where you store different types of information. For a warehouse system, we need several libraries because we’re dealing with different types of data – just like how you wouldn’t mix your shopping list with your address book.
Starting with AI Assistant
 Memento Database has a built-in AI assistant that can help you create the basic structure for your database. Here’s how to use it effectively:
1. If you simply type “warehouse inventory” in the AI assistant (Menu > Add Library > AI Assistant), you’ll get a basic template.
2. Try entering “warehouse inventory software” instead. This more specific prompt gives us a comprehensive structure with multiple libraries:
– Warehouse (for storing location information)
– Inventory (for your products)
– Suppliers (for vendor information)
– Users (for staff access)
– Inventory Transactions (for tracking movement of goods)
Note: The AI assistant might suggest a slightly different structure based on your prompt. Feel free to experiment with different prompts to get the exact libraries you need. For example, you might try “retail warehouse management” or “wholesale inventory system” to get different suggestions.
Connecting Libraries Together
One of the powerful features of Memento Database is the ability to link libraries together using Link to Entry fields. This creates relationships between your data, making it more organized and useful. For example:
– In the Inventory Transactions library, we have a field called “Product” that links to an entry in the Inventory library
– When creating a transaction, you can simply select the product from your inventory list
– This connection helps maintain data accuracy and makes it easier to track product movements
Making It Your Own
While these AI-generated libraries are ready to use, we can enhance them to fit your specific needs perfectly. Let’s focus on making the Inventory library truly remarkable.
Creating Smart Quantity Tracking
In the Product library, you can add any fields that describe your specific products. You can either:
– Ask the AI assistant to suggest relevant fields during the initial library creation by describing your products in the prompt
– Add custom fields at any time later as you think of new properties you want to track
For example, if you’re managing an electronics store, you might want fields for brand, model, technical specifications, and warranty information. For a clothing store, you might need fields for size, color, material, and season.
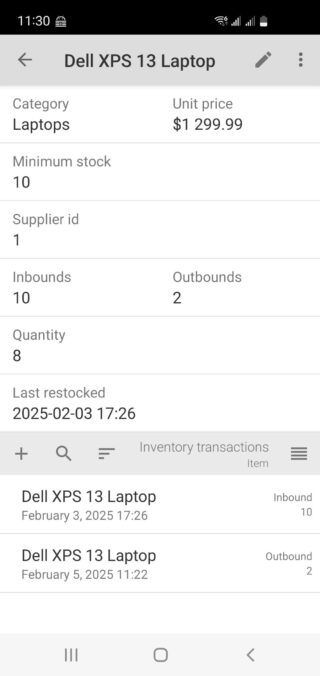
The most important part is setting up automatic quantity tracking that will display right in each product’s card. Here’s how to do it in the Product library:
Understanding Lookup Fields
A Lookup field is a special type of field that can gather and calculate information from other libraries. Think of it as a smart calculator that automatically pulls and processes data from your transactions. It’s particularly useful for inventory tracking because it can automatically sum up all your incoming and outgoing products.
Setting Up Quantity Tracking in Product Library
1. Go to Menu > Edit Library for your Product library
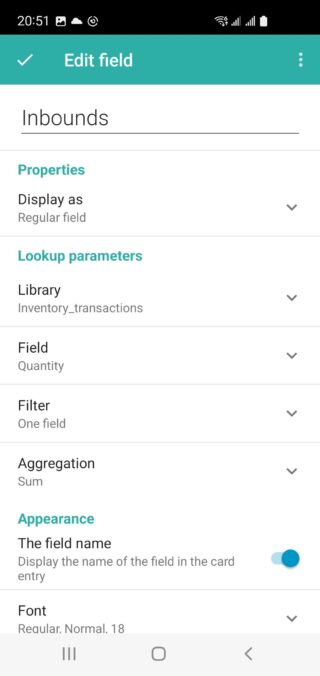
2. Add a new “Lookup” field called “Inbounds”
– Select “Inventory Transaction” library
– Choose “Quantity” field
– Set filter: Transaction Type = Inbound
– Set aggregation to Sum
This field will now automatically total all incoming quantities for this specific product.
3. Create another “Lookup” field called “Outbounds”
– Same settings, but filter for Transaction Type = Outbound
This field will track all outgoing quantities for this product.
4. Finally, add a “Calculated” field called “Current Quantity”
– Use the formula: #{inbounds} – #{outbounds}
Now, when you open any product card, you’ll see its current quantity automatically calculated based on all related transactions. When you receive new items, create an “Inbound” transaction, and when you ship items out, create an “Outbound” transaction. The quantity in the product card will always be accurate without any manual calculations.
Another Smart Use of Lookup Fields
Here’s another useful example: The AI initially creates a simple ‘Last Restocked‘ date field in the Product library. We can make it smarter by converting it to a Lookup field:
1. Go to the Product library structure
2. Change ‘Last Restocked‘ to a Lookup field
3. Select Inventory Transaction library
4. Set filter: Transaction Type = Inbound
5. Choose the transaction date field
6. Set aggregation to “Max”
Now the ‘Last Restocked‘ date in each product card will automatically show when you last received this item in stock – no manual updates needed!
Remember, this is just the beginning – you can customize these libraries further based on your specific needs, but this setup gives you a solid foundation for professional warehouse management.
The best part is that all these features – from creating libraries with AI assistance to setting up smart Lookup fields – are available across all Memento Database platforms: Android app, iOS app, and the desktop application. You can work with your inventory system wherever it’s most convenient for you, whether you’re walking through the warehouse with your phone or working at your desk with the desktop software.