
Integration Capabilities
With Zapier, you can connect Memento Database to many popular services, including Google Sheets, Trello, Slack, Gmail, Dropbox, and more. This enables various automation possibilities, such as:
- Automatically adding records to Memento from other applications.
- Synchronizing data between Memento and cloud services.
- Automatically updating Memento records based on events in other applications.
- Sending notifications and alerts via messengers or email when data changes in Memento.
Setting Up Zapier Access to Memento Database
To allow Zapier to work with your Memento libraries, you need to create an access token. This can be done in the desktop version of Memento Database:
- Open Memento Database on your computer.
- In the Account menu, select Access Tokens.
- Click the Generate Token button.
- Configure the access permissions for the token:
- Choose whether the token will apply to a specific library or all libraries.
- Define the level of access:
- Read entries – allows Zapier to retrieve data.
- Write entries – permits modifying existing records.
- Create entries – enables adding new records.
- Save the token and use it when setting up Zapier.

Configuring Integration in Zapier
- Go to the Memento Database integration page on Zapier.
- Choose the application you want to integrate with.
- Connect Memento Database by entering the generated token.
- Configure triggers and actions.
- Save the settings and activate the Zap.
The automation is called Zap. Zap is a mix of a Trigger and an Action. Trigger stands for an event that should take place in order to execute a Zap. Action is a process that will be performed automatically. So, if you need to send an email once the new entry is added to the Library, you set a Zap with “Entry creation” as a Trigger and “Email creation” as an Action.
With Memento Database, you have two Triggers: Entry Created and Field Value Changed. The first one allows you to create an automated Action when the new entry is added to the chosen Library, and the second one starts Zap when any field of the entry is edited or added.
Actions available in Memento Database allow you to create or update an entry or to find the one that matches the search criteria.
Examples
In the example below, we will link the entry creation to Gmail and will set Zapier to send an email once the new entry is added. To do so, perform the following steps:
- Search for an app you want to connect. In this example, Gmail was chosen
- On the next step, choose an Action. In this example, Send Email was selected
- If Gmail hasn’t been associated with Zapier yet, connect it using the standard Google authorization
- Adjust the email parameters including email recipient(s), subject, body type, body, attachments, reply-to address. In this example, the email about a new event will be sent once the new entry for My Plans Library is added. In Body section, the entries from the Library were chosen:

- Click Continue button to save changes
- Click Send Test button to check the email example Skip Test and Finish to save a Zap
- Type the Name for this Zap and turn it on using the toggle:

How to create entries in Library via Zapier?
With Zapier, you can create new entries in Memento Database Libraries automatically when some event takes place. In the example below, we will link Google Calendar to My Plans Library. Once the new event is added to Calendar, it will be also added to Memento Database Library. To do so, follow the steps below:
- In your Zapier account, click Make a Zap button or Make a New Zap button available at My Zaps tab
- Search for Google Calendar in the list of connected apps
- Select the Trigger for entry creation and click Save + Continue button. In this example, we will create an entry when the new event is added. Also, you can do the same for the event that starts, ends or is being canceled
- If Google Calendar hasn’t been associated with Zapier yet, connect it using the standard Google authorization
- Choose the account connected to Calendar and click Continue button
- Look through the samples from Calendar and click Continue button
- The Trigger is successfully set. Click Your Zap currently lacks an Action step. Add one now! link to start adjusting an Action
- Choose Memento Database as an Action App
- Choose the required action: Create, Update or Find an Entry and click Save + Continue button. In this example, creation was chosen
- Choose the Library to add an entry to, define its fields and click Continue button. You can link each field with the corresponded information from Google Calendar event
- Click Send Test to Memento Database to check your Zap or Skip Test and Finish to save a Zap
- Type the Name for this Zap and turn it on using the toggle
Please note that Zapier checks Google Calendar events once per 5 minutes. Wait a bit to get it synced with Memento Database.
How to create a Zap with several steps?
Zapier allows you to set comprehensive Zaps with several steps. In the example below, we will check the order email to find the correspondent item in Products Library. Once it is found, we will create a Google Calendar Event to ship the ordered item. To create such a Zap, follow the steps below:
- In your Zapier account, click Make a Zap button or Make a New Zap button available at My Zaps tab
- Search for Gmail in the list of connected apps
- Click New Email Matching Search option and then Save + Continue button
- If Gmail hasn’t been associated with Zapier yet, connect it using the standard Google authorization
- Specify the search parameters and click Continue. In the example, we are waiting for “order” in the email subject, so the line is “subject:order”
- Zapier will suggest you the emails that fit the conditions set on the previous step. Review them and click Continue
- The Trigger is successfully set. Click Your Zap currently lacks an Action step. Add one now! link to start adjusting an Action
- Choose Memento Database as an Action App
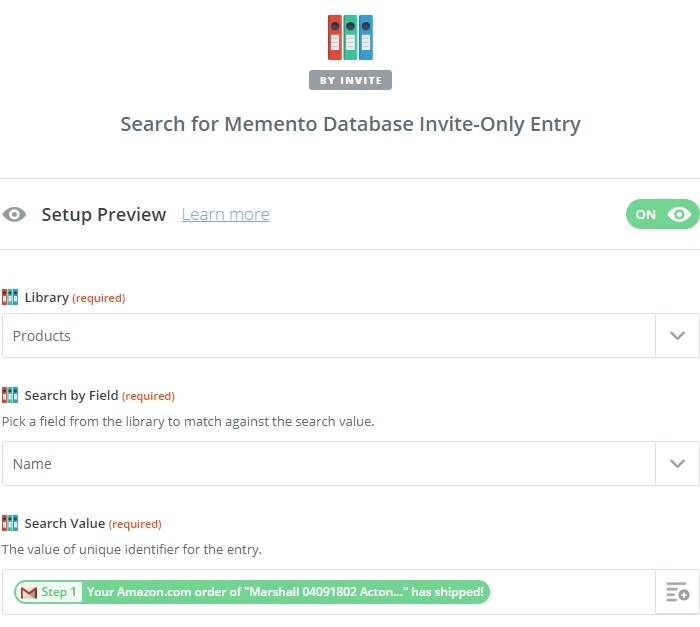
- Choose the required action: Create, Update or Find an Entry and click Save + Continue button. In this example, Find an Entry was chosen
- Set the fields you are looking for and click Continue button. Library, Field and Search Value are required. In the example, we choose Products Library, Name Field and Body:
- To test the first step, click Fetch & Continue. To go next without testing, click Skip This Step and Continue on the next page.
- The first Action is successfully set. Click Your Zap currently lacks an Action step. Add one now! link to start adjusting the final one
- Choose Google Calendar as an Action App
- Select Create Detailed Event and click Save + Continue button
- Adjust the Event. Google account, Start and End time are required. Once you are done, click Continue button
- Click Send Test To Google Calendar to check how it works or click Skip Test button and Finish to save changes
- Type the Name for this Zap and turn it on using the toggle
Please note that Zapier checks Gmail once per 5 minutes. Wait a bit to get it synced.