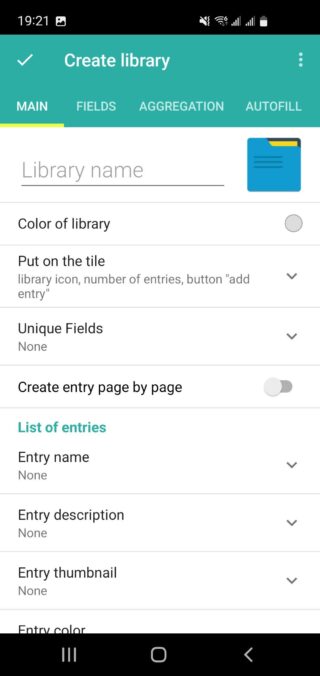
Creating a new library from scratch in Memento Database allows you to tailor it exactly to your needs. Follow these steps to set up your library manually:
- Start a New Library: From the “My Libraries” screen, tap the burger menu (three horizontal lines) at the top-right corner, select “Add Library,” and choose “Start from Scratch.”

- Set Up the Main Tab: A new screen will open, starting with the Main tab. Here, you need to configure basic settings for your library:
- Library Name: Enter a unique name for your library to differentiate it from others in your collection or group.
- Color: Choose a color to help highlight and easily recognize your library in the list of all databases.
- Configure the Fields Tab: Fields function similarly to columns in a spreadsheet. Fields are the individual data points or attributes you want to store in each entry of your library. Creating and configuring fields is a crucial part of setting up your library because they define the structure and type of data you will collect. Here’s how to do it:
- Add New Fields: Navigate to the Fields tab and click the ‘+’ button at the bottom-right to start creating your fields.
- Field Types: Choose from various field types depending on the kind of data you want to store. Common field types include:
- Text: For plain text entries.
- Integer and Real number: For numerical data.
- Date and Date/Time: For calendar dates.
- Checkbox: For binary yes/no or true/false values.
- Single-choice list and Multiple-choice list: For selecting from predefined options.
- Others: There are many other specialized field types available. For detailed information, refer to the Field Types article.
- Purpose of Fields: Fields allow you to organize and manage your data efficiently. They help you:
- Store relevant information in a structured manner.
- Facilitate searching and filtering of data.
- Enable sorting and aggregation of data for better analysis.
- Customize the data entry process to match your specific requirements.
- Field Settings: Set up each field by defining its name, type, and any additional parameters, such as default values or validation rules. For more detailed information about field settings, refer to the Field Settings article.
- Configure Additional Tabs: After setting up your fields, switch to the remaining tabs to further customize your library:
- Aggregation Tab: Set up aggregation options if you need the library to perform calculations or summarize data automatically.
- Autofill Tab: Configure fields that should be automatically filled with predefined values or generated based on certain criteria to save time during data entry.
- Finalize Your Library: Once you have finished configuring all the settings in the various tabs, save your new library.
- Flexible and Ongoing Customization: It’s important to note that you can add or modify fields and adjust other settings at any time. This flexibility allows you to develop your library step by step, making changes as your needs evolve.
