In memento Database, sharing a Library with your colleagues is easy but powerful. You can adjust actions each user or user group can perform with your Library and adjust the visibility of fields. To adjust the permissions, select the Library and click the relevant option from its context menu or from Edit menu. The new window will be opened. Here, start from adding a new user or user group. To do so, follow the steps below:

- Click
 icon from the toolbar
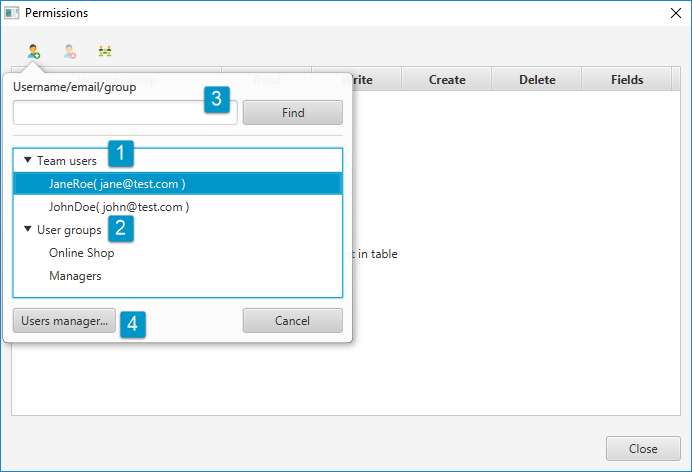
 - Choose a user from the team (1), the user group with similar permissions (2) or type the email or username of a person who is not in the list (3). If there’s nobody in you team yet, click Users manager… button (4) and follow the instructions about how to add a user or a group.
- Double-click the selected item. It will be added to the list:

Now it’s finally time to adjust the personalized permissions:
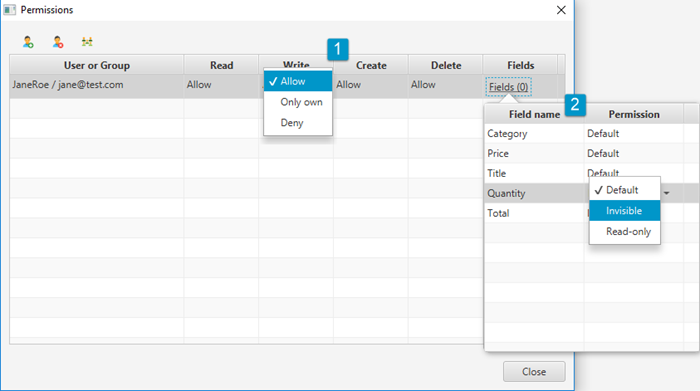
- You can define whether this user or user group can Read and Write entries in the Library, Create the new ones or Delete the existing entries. There are three possible options for each action:
- Allow means that the user can perform this action for all entries in the Library
- Only own means that the user can perform this action for entries he created
- Deny means that user can’t perform this action for any entry in the Library
- You can define specific permissions for each Field in the table. There are three possible options:
- Default means that the user will see this field in the same cases you (as a manager) see it
- Invisible means that the field will be hidden from the user
- Read-only means that the field will be shown to the user, but he won’t be able to edit it
To discard the adjusted permissions, remove the user or the group from the table by selecting it and using ![]() icon from the toolbar. Additionally, you can adjust permissions for public users — anyone in Memento Database network. To add a public group, click
icon from the toolbar. Additionally, you can adjust permissions for public users — anyone in Memento Database network. To add a public group, click ![]() icon.
icon.
